
When my oldest decided he wanted to have an Among Us birthday party this year, I didn’t realize I’d be trying to figure out how to make an Among Us cake myself. The year’s been crazy enough as it is! I assumed I’d roll into Walmart and order the cake when I bought the party decorations.
Well, pump the breaks on that.
Apparently Among Us, despite being a wildly popular game, is made by kind of a small-time company. They, apparently, don’t have any major distribution deals for party production. So… I was all on my own for the birthday cake with less than two weeks until the birthday party.
That’s when I started browsing Pinterest for Among Us birthday cake ideas.

On Pinterest, I found some awesome looking Among Us cakes. BUT a lot of them were going to be time consuming and require skills I don’t really have (like this sculpted Among Us cake–super cool, but no). That’s when I decided I needed to figure out:
How to make an Among Us birthday cake the EASY way.
The upside of Among Us is that the characters are really super simple (which was a welcome change after being asked to make Charizard cakes for my son the previous two years). If you want to make an Among Us cake with no weird supplies or special sculpting talents, this is the tutorial for you!
Don’t get me wrong, I LOVE to check out some of the amazing cake constructions you see on Food Network, and I’ve even tried my hand at a few over the years. But now?
Now, I have four kids and my oldest son’s birthday is during that insane part of spring when sports, school, and other family obligations all coincide. I lack the time and patience for 3D cake construction.
This Among Us cake was the fastest birthday cake of all the themed homemade cakes I’ve created over the years (even faster than my DIY Elmo Birthday Cake!).
And the best part? You don’t need any weird supplies to make it yourself at home.
Here’s What I Used:
Boxed cake mix (I am a boxed cake devotee. I will never be converted to the from-scratch team)
White canned vanilla frosting
Aluminum foil
PAM cooking spray
Rectangular cake pan (I was given this 9 x 13 Calphalon pan, but this one seems much more reasonable price-wise)
*Note: Depending on the color you decide to make your Among Us cake, you may want to just buy pre-tinted frosting. My son wanted purple, which is pretty easy to dye yourself using white frosting and a little bit of gel dye. If you wanted to make your cake red or black, those colors are really hard to achieve and store-bought is probably the way to go.
Bonus points to you if you can convince your child he or she wants a WHITE or BROWN imposter. You can use that icing straight out of the can! (All you’ll need to tint is the visor part.)
How to Make Your Among Us Cake the Correct Shape — Without a Special Pan
Making character cakes is really fun, but if you buy a special pan every time you make a new character, you’ll go broke. Plus, your cabinet space will evaporate.
I try to make as many cakes as possible using just my basic circle or rectangle pans. To make this Among Us cake, I used a 9 x 13 baking pan.

You could make your Among Us cake by cooking a full pan and then carving out your crewmate or imposter. The challenge is that, with a pan this large, the cake will be a little shallow. If you do that, you’ll probably want to use two boxes of cake mix.
Instead, I improvised with some aluminum foil in order to minimize wasted cake. This way, I only had to use one box. (I did this same foil trick when I made my homemade Elmo cake using a circle cake pan.)
Bend some aluminum foil to make the round part of the crewmate’s head. Bend another section of aluminum foil at the bottom to help shape your character’s leg.

You’re going to pour your cake batter into all the space between these foil sections. You’ll notice that you waste a lot less cake because you won’t have to cut away the corner sections. You’ll only need to cut out the space between your crewmate’s legs.
Don’t overthink the shape of your foil too much. You’ll trim up the cake after you bake it.
Pouring the Cake Batter — A Quick Tip
When you set up your aluminum foil, do your best to ensure it makes complete contact with the bottom of the pan. This will help prevent any/too much batter from leaking under it into the parts of the cake pan you don’t want to use.
Then, before you pour the cake batter, douse the whole thing in PAM cooking spray (or whatever brand you use). Make sure you reeeeeeally get the foil well coated because that sucker will stick.
*Make sure the oven is preheated and ready to go before the next step.
Then, pour the batter into the section between the aluminum foil sections. Now, put the pan into the oven immediately.
As you’ve probably guessed, your makeshift foil Among Us -shaped pan is a little rickety. The longer you wait, the more cake batter will seep under the foil. If you get it right into the oven, the amount of batter that will seep through into the sections of the pan you don’t want should be minimal.
Baking your Among Us Cake
How long you bake your cake will depend on the size pan you use. For mine, I set the timer for 20 minutes and then checked it every 2-5 minutes after that. When a toothpick came out clean, I took it out of the oven and let it cool. 
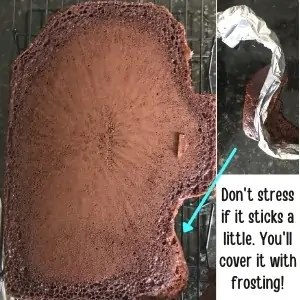
Once your cake cools, you should be able to easily remove the foil. If any parts of it stick, cut it away carefully so you don’t butcher the cake.
Trimming the Cake into A Crewmate (or Imposter)
Don’t trim the cake until it’s cooled completely. Then, carefully clean up any edges where the foil stuck. Finally, carefully cut away a section at the bottom to make two separate legs.
At this point, you have two choices. You can leave it as is, which is easier.
Or you can do what I did, which is trim all the way down the right side, tapering out near the top. That will make it look like the visor part of the crewmate’s face is sticking out slightly, the way the actual Among Us characters look. The annoying part is –the more trimming you do, the more crumbly the cake–so the more difficult it is to frost.

Icing Your Among Us Cake
I scooped about ½ cup of frosting into a separate container. Then, I tinted the rest of the can of vanilla frosting to purple — I used some of the purple gel dye and a little of the blue dye too (it helps the purple be a little deeper).
For the separate ½ cup, I used just a tiny smidge of black and teal gel dye from this set. I mean, really, the tiniest smidge. A little bit goes a really long way with these gel dyes. You’ll use that for the crewmate’s visor.

![]()
(I used this particular box, pictured above, for about five years. Even then, I only got rid of it because they started to dry out, not because I came even close to running out. I bought the exact same box again.)
I used a sharp knife to carve the outline of how I wanted to ice it directly onto the cake itself. Since you’re going to cover it anyway, you can adjust and re-carve until the lines/outline looks exactly how you want it.
Then, do a quick, thin “crumb coat” on the cake. This will make sure any crumbs from where you trimmed stay out of the final layer of icing. Let the icing cool/set/dry (I stuck the cake in the fridge for about 20 minutes). Then do your final layer.
(I realize now that I forgot to take photos of the icing process, so the short summary is: Thin purple layer everywhere except the visor. Thin grey layer on the visor. Let dry and repeat until no cake shows through. Finish with the black lines. My bad.)
Outlining the Cake
I originally ordered black fondant to do the icing outline (specifically, this exact one). That probably would’ve worked well, but as I have been known to do many times before, I forgot to check out. When all my cake decorating items arrived from Amazon, the day before the birthday party (because I’m super organize like that), the fondant wasn’t there. Because it was still chilling in my cart. Awesome.
I decided to try black prepackaged cookie-decorating icing as a last-ditch attempt because Walmart let me add it to my curbside pickup order. (I have four kids and hate shopping anyway. I’m not taking them in the store and juggling their masks, fighting, whining, etc.).
It actually worked like a charm! Bonus — it was so much faster than it would’ve been to roll out, trim, and place the fondant.
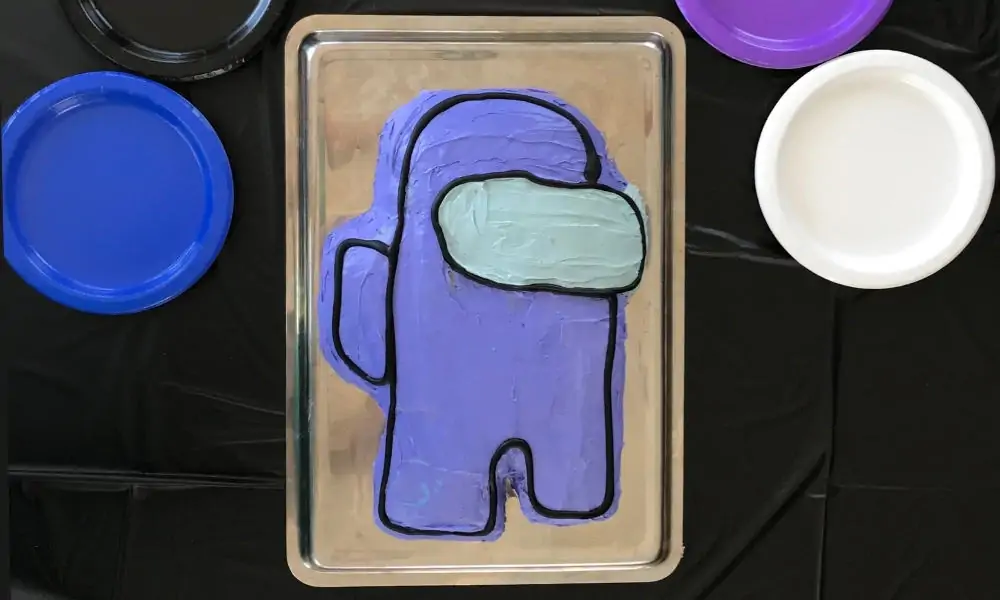
So here’s the finished product:

You’re not going to see this type of Among Us cake on Cake Wars or anything, but it was fun and festive — and my son loved it!
What if you want a smoother surface on your cake?
The lines/streaks in the frosting didn’t matter to me, and I was pressed for time. If you really want a smooth finish, you could melt the frosting in the microwave (just barely, until it’s pourable). Then pour the frosting over your cake and let it dry for a smooth finish (that’s what I did that for the BB8 Cake for my son’s Star Wars Birthday party).
If you opt to go the pouring route, you’ll want to do it over a wire rack or wax paper so you can move the cake, once it dries, to a new base. You’ll also probably need more than one can. You could also just use colored fondant instead.
I hope you found this tutorial helpful so you can make your own Among Us cake. If you give it a try, I’d love to see the finished product. You can use the “tried it” feature on Pinterest (Pinterest.com/thewildwest3), or you can tag my fb page (@thewildwest3).
Good luck and Happy Baking!