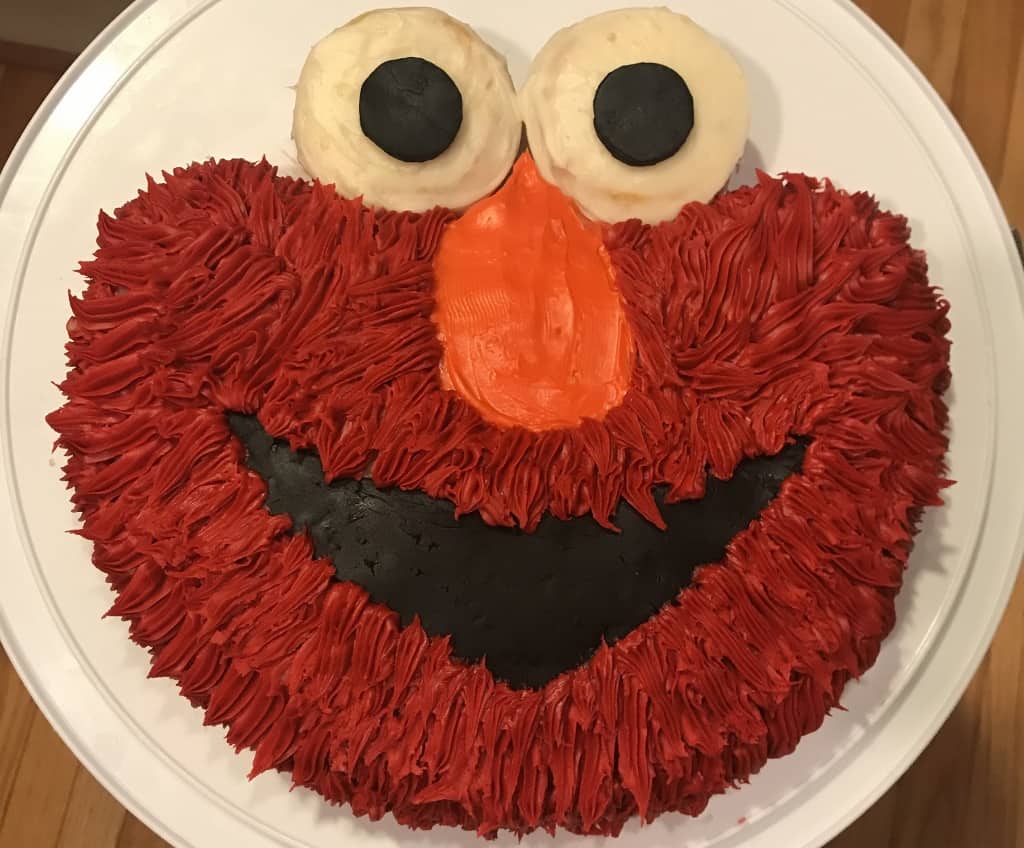
Wondering how to make an Elmo cake that won’t cost a fortune or take up all your time?
I’ve got you covered.
I know a lot of people who’ve made an Elmo birthday cake for their child’s first birthday. In our household though, the Elmo switch flips a little later.
Right around the 18-month mark, our kids become obsessed with Elmo. As such, this is the second time we’ve had an Elmo-themed second birthday in our family (and there probably would’ve been three if we’d given Kid2 the Elmo option).
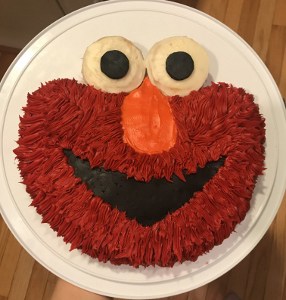
The first time around, I ordered a Sesame Street Elmo cake from BJ’s. That was easy (and tasty), but it wasn’t particularly impressive or special. This year, I decided to make my own Elmo cake for my son’s birthday and it was a success — and one of the easiest DIY birthday cakes I’ve tried (and I’ve made several over the years).

Materials to Make Your Easy Elmo Birthday Cake– What I used:
{This post contains affiliate links. This means that if you make a purchase through one of the links in this post, I may receive a small commission at no additional cost to you. Please see my disclosure page for details.}
1 box of cake mix (you may want two boxes depending on how many you’re feeding and how much cake you’re going to waste cutting –details below).
The ingredients to bake your Elmo cake, according to the box directions
1 10-inch pan (there’s a lot of flexibility on this; see details below) OR 1 Wilson’s Elmo Cake Pan
1 container of red decorator’s icing
1 container of white icing
A small amount of black fondant for eyes and mouth
Food coloring for Elmo’s nose (orange or yellow — color details explained below)
Do You Need An Elmo – Shaped Cake Pan?
Wilton actually makes a cake pan shaped like Elmo you can use for your Elmo cake (see image below). This Elmo Birthday Cake Tutorial can be done with or without the special pan.
If you think you’ll make an Elmo cake more than once or if you have a friend who may want to make an Elmo birthday cake at some point in the future, the pre-fabricated Elmo cake pan is definitely a good option. Even if it likely won’t be used again, if you don’t mind having the extra pan laying around, I say “Go for it!” They’re not particularly expensive and they do simplify things a little.
With that said, I HATE having extra stuff in my kitchen cabinets. I already use most of the extra cabinet real estate to house random junk that I shove in there when company comes, and then I leave it there forever. Cabinet space is at a premium in our house.
Plus, I like to make creative and original birthday cakes every year, so I know I won’t be re-using an Elmo cake pan. Instead, I took the closest, logically-shaped pan I could find and made-do with PAM spray and a little tin foil. I show you how to make an Elmo cake without the pan in the next section.
How to Bake Your Elmo Birthday Cake
Here’s what you do:
Decide on the best pan you already own. For me, to create the easy Elmo birthday cake you see pictured, I selected a 10-inch round pan because it was close (enough) to the shape of Elmo’s face and it allowed me to use only one box of cake mix.
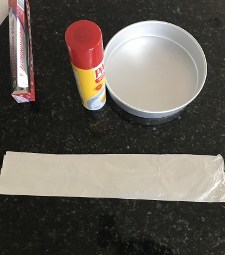
Spray your pan generously with nonstick cooking spray.
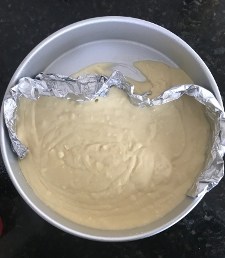
Take some tin-foil and fold it up into a fairly stiff, long rectangle. Place the tin foil inside your larger pan to help turn it into a more Elmo-shaped pan. That tin foil will form a barricade for the cake batter in the pan (make sure the tin foil bottom is firmly planted on the bottom of the pan). Spray the fin foil generously with nonstick spray as well.
Don’t stress too much about this — the tin-foil-assisted Elmo cake shape won’t be perfect and some batter will leak under/around the foil. Still, creating this little makeshift barricade will keep you from wasting too much cake mix you would just be cutting away later to create the shape of Elmo’s face.
(Yes, cake mix is cheap — I’m more worried about the hassle. If you don’t barricade off some of the extra space in the pan, you’ll end up needing just a little more than one box of cake mix. What a pain!).
You could certainly bake an entire large rectangle or round cake and cut the Elmo cake shape out of that finished cake, if that’s what you prefer to do.
Just do the best you can in creating the Elmo cake shape and pour the batter in (*optional: reserve enough batter to make two average-size cupcakes; see note below). Place your soon-to-be Elmo cake into the preheated oven immediately and bake according to the package instructions.
Watch your Elmo cake carefully. Baking time will vary based on the size and shape of the pan you’ve chosen. When it starts to look a little done, watch it closely and check it regularly with a toothpick. When the toothpick comes out clean (or clean-ish), it’s done.
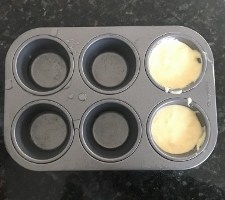
*Optional note about the two cupcakes: You can either bake and shape your whole Elmo cake to include eyes OR you can bake two separate cupcakes to use as eyes (this is what I did and it was really simple — plus, my two older sons were thrilled to have Elmo cupcakes AND cake all in one).
Now: Time to Cut And Shape The Cake
Allow the cake to cool and then remove it from the pan. Place it on a clean, flat surface.
Now, depending on how well your foil barricade worked, you have some cutting to do.
Cut the edges of the cake so they are shaped like Elmo’s face. I did this freehand (two-year-olds aren’t picky and neither am I), but if it makes you too nervous, you can certainly print out a template (Pinterest has some great ones here). Place the Elmo template on the cake (you can secure it with toothpicks) and cut from there.

How to Organize and Design Your Elmo Cake
I recommend doing a quick skim-coat of icing over your Elmo cake because it will hide any gaps that you might create when creating Elmo’s fur. I did my coat in white icing because that’s what I had opened already, but red is probably the best choice.
Once you’ve done your skim coat, trace the outline of the face you intend to create. I “re-drew” (with a toothpick) Elmo’s mouth at least four times until it looked the way I wanted.
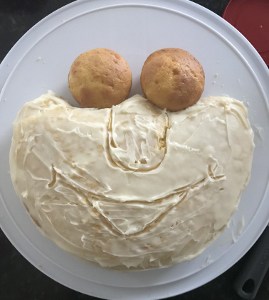
As I mentioned earlier, if you used a stencil/print-out to cut out Elmo’s head shape, you can also use that to create his facial features (using the toothpick, you would poke through the paper repeatedly to create lines similar to what I “drew” in the photo above).
I was honestly too lazy to deal with the computer, printer, and properly sizing the print-out to my cake, so I sketched the lines freehand with a toothpick and just kept “erasing” any mistakes by smoothing out the icing and “drawing” it again until the Elmo cake took the shape I wanted him.
How to Frost Your Elmo Cake
You can tint your own frosting. I have this 12-pack of gel dye that I’ve been using for years and it allows me to create almost any shade I want. However, red is a really difficult color to achieve and it requires a lot of dye (otherwise, it’s just pink).
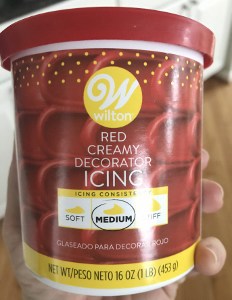
To me, it’s not worth the hassle. I always buy my red and black frosting and fondants pre-dyed. It costs a little more, but it’s worth it to me. For my Elmo cake, I bought two cans of Wilson’s Red Decorator icing.
I only ended up needing one can, but I was afraid of running out halfway through and having to haul three kids to the store with me. I shelled out the extra $5 for the peace of mind of knowing that wouldn’t happen, which is probably why I didn’t need it. Had I bought only one, you can bet it wouldn’t have been enough.
I did tint my own orange frosting for Elmo’s nose, because that’s easy. I combined a little of the pre-done red frosting, some of the plain white/vanilla frosting, and a little yellow food coloring until I achieved what I felt like was the “right” color.
I use a special food coloring meant for cake frosting, because it doesn’t water-down the consistency of the frosting. However, it’s for a very small part of the cake (Elmo’s nose) and you don’t need it to be thick to maintain a particular texture (unlike Elmo’s fur), so if you don’t have the special gel dye, you should be able to use a drop or two of regular yellow food coloring without a problem.
I do highly recommend the gel dyes though, because they’re inexpensive and a little goes a long way –I’ve been able to stretch mine out for years (just be careful not to let them dry out).
You could just frost your Elmo cake using a regular spatula in three sections — red for fur, white for eyes, orange for nose (well, plus black for the smile and eyes), but that gives it a very novice-look. Plus, frosting a cake this way shows every line or imperfection. It seems easier, but I actually think it’s harder to frost a cake this way
To me, the easiest way to elevate your Elmo birthday cake and make it look more professional is to use a cake decorator tip that gives the illusion of fur. It’s repetitive (you literally do the same stroke over and over and over again), but it looks so much nicer (and it’s a lot more forgiving when it comes to mistakes and general laziness).
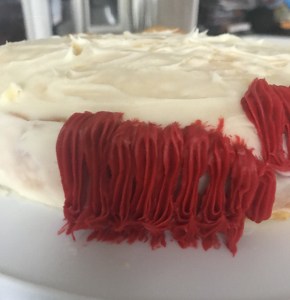
This is the easiest “cake decorator” technique. I use it all the time because it’s so simple and forgiving.
The tip I used for this is #22. I received this mega-pack of cake decorator tips as a birthday gift years ago, and there’s several different tips that can work for this texture.
Frankly, I’m not that organized, so I usually just pull out a few and try them. The first one that comes out looking fur-like is the one I use that day. The larger the tip, the less strokes you’ll have to do, so if time is an issue, bigger is better.
As you can see from the photos, I did the red icing first and then added the accents. In hindsight, it would be easier to apply the accents first, and then pipe Elmo’s fur around them. Live and learn.
To make Elmo’s nose, apply a small amount of orange frosting and then smooth it outwards. I had to be careful, since I’d already made Elmo’s fur, but again, if you start with the nose/mouth/eyes and then pipe Elmo’s fur, this will be less of a concern for you.

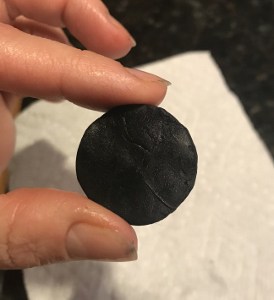
To make Elmo’s mouth and pupils, I used black fondant. I just rolled it out and cut accordingly using little fondant-cutting tools I had at home (I bought this three-pack and I have gotten A TON of use out of it).
You could also melt chocolate (milk or dark) and pipe it into a mouth-shape and fill it in. It won’t be black, but it will be tasty.
I usually have some colored fondant laying around the house from previous cake projects. The fondant typically goes “bad” (ie dries out and becomes questionably edible after a few weeks or months), but it can be rehabbed.
I’d rather use a little old fondant than re-purchase a whole new box for one or two accents–and don’t get me started on making your own. I know it can be done, but not by me. I can barely find the time to shower.
Add a little vegetable oil, microwave it for a few seconds, and work with it for a few minutes and it usually becomes usable again. Personally, I don’t let my kids eat the fondant pieces anyway, so I don’t stress that much about how old it is or isn’t.
If you plan on eating it, I would not make this Elmo cake with the fondant that’s been sitting in my pantry for the past year. Your call.
Another option is to buy a small sample-pack of fondant like this one so you don’t have to open and waste an entire large portion of fondant for a small amount.

As I mentioned earlier when you were baking your Elmo cake, you can incorporate his eyes into the cake itself or bake them separately as cupcakes (which is what I did). Either way, frost them white, add the pupils, and voila! Your Elmo cake has eyes.
A few tips about the eyes, based on my mistakes:
1. Make sure your vanilla frosting is WHITE. I used an all-natural vanilla frosting and, while it did the trick, the white wasn’t the bright, popping white color I’m accustomed to. I wasn’t about to throw it out and waste the can, but now I know better for next time.
If you look at the photos of my finished Elmo cake, you can kind of see how the whites of the eyes don’t really “pop.”
2. If you’re making cupcakes for Elmo’s eyes, make sure you frost all the way around them (including the sides).
I did all my work from the front side of Elmo, on the kitchen island. Being relatively short, I never really caught a glimpse of the side of the cake until I was presenting it to my son. No one else noticed, but it bugged me that I could see bare spots on the cupcakes (you can see them in the very last photo of the Elmo cake in this post).
Your Easy Elmo Birthday Cake: The Finished Product
Don’t get discouraged as you’re working, because the look of the cake is a little misleading until all the pieces are in place. Numerous times during this process, I thought, “Crap, I can’t believe I made all this effort and it looks like this. I should’ve ordered from Walmart.”
Once you’re nearly finished, give your Elmo birthday cake a once-over. Make sure there are no bare spots, and if there are, add some more fur to cover them.
Also, make sure the fur looks relatively natural. If any pieces need some repair, again, cover them with some new fur-frosting. Use a toothpick to repair any spots that look a little off or where the frosting needs a little re-positioning (the toothpick can help you preserve the fur-like texture).
Making this cake took about an hour (including tracing out the lines, tinting the frosting, rehabbing and rolling out the old fondant, etc.)
That hour does not include the baking time for the cake, which, in case you’re wondering, was approximately 3,000 hours because I had three kids fighting and “helping” me make it.
Other Potential Variations: Elmo Cupcakes, Elmo Smash Cakes, etc.
The great thing about a design like this is that it’s super flexible. If you wanted to do this for an Elmo First Birthday, you could scale this design down and make a smaller Elmo “smash cake” for the birthday boy or girl. Then you could bake a simple, larger cake (or order a larger Elmo sheet cake from Walmart, etc.) for the rest of the party guests.
If you wanted to make an Elmo cupcake cake, you could do that too. Instead of baking one 10-inch Elmo Cake with two additional cupcakes for Elmo’s eyes, you could just bake a whole box of cupcakes and then place them together in the shape of Elmo. You could then use the same frosting techniques (frost two with white for the eyes, one with orange for the nose, and the rest with red for the fur — adding the black mouth accents as needed).
If you have a lot of time, you could do a small-scale version of this design on each individual cupcake, so that each cupcake was a complete Elmo cupcake on its own. Just know that it will take a while to make 24 (or however many a box makes) individual Elmo cupcakes.
Whether you make your Elmo cake exactly the way I did or you mix it up, I hope you find this DIY Elmo Birthday Cake tutorial lives up to my promise: easy and cheap.
As you can see from the photo above, my son loved his Elmo birthday cake and spent a full week talking about his “Elmo birthday” — and literally, the only thing special/Elmo was the cake itself (no Elmo party ware, banners, balloons, etc.)– third child problems, ha!
I wish you the best of luck and happy baking!

Here’s Everything You Might Need or Want To Make This Elmo Cake:





This is so cute! I know my granddaughter would love this!!!
Hi Jennifer,
Thank you! Yes, the love for Elmo seems to be universal in the baby, toddler, and preschool years! My kids follow a pretty predictable pattern from loving Elmo and Sesame Street at ages one and two, to loving Star Wars from ages three to five. This Elmo cake was super easy to make and took very little time!
Charissa
This is SUPER cute!! And it looks SO good!!
Thank you! Pre-kids, I liked decorating very elaborate cakes and taking all kinds of time to do them. Now that I have three (soon to be four) boys, I am all about cakes that look cute but don’t require much time and aren’t difficult to do. This Elmo birthday cake fit the bill on both counts!
Charissa
Awesome article.
This is so great and helpful! I love the way Elmo’s fur looks. My daughter is in an Elmo stage right now, so this will be perfect to make for her 2nd birthday party!
Hi Cayla,
I’m so glad you’ll be able to use this Elmo cake tutorial! I almost made an Elmo cake for my oldest years ago, but took the lazy way out and ordered a sheet cake from BJs (or Walmart, I forget). After yet another kid of ours became obsessed with Elmo by his second birthday, I decided I better just figure out how to make an Elmo cake and do it!
Best of luck!
Charissa
Such a clever idea!!! I have spent so many dollars on the specific pan, I love the idea of creating the cake!!!
Hi Jennifer,
You know, this was my third time trying something like this without the specialized cake pan. I did the same thing with a T-rex cake and a Chewbacca cake. Each time, I was surprised how easy it was. I wasn’t sure if we would have any more kids, so I figured buying the Elmo cake pan might be a waste of money. Of course, now we’re having another baby boy, so there may be another Elmo birthday cake in our future, but I am glad I don’t have to store one more cake pan in my kitchen!
Charissa
SUPER-cute! I love how you can make this w/out the standard “Elmo” pan – you’re so creative and I think this will be easy for a lot of us to do!
You did an amazing job! I love how you DIY’d that pan and made what you have work.
Hi Ayanna,
Thanks so much! Yes, at first when I was trying to decide how to make an elmo cake, I thought I’d use the pan, but I decided I got tired of having the leftover pans just hanging around the house and taking up space. I mean really, how many elmo cakes is one person likely to make in a lifetime? 🙂
Charissa
This is so cute I love the way you decorated his face. I had no idea you could get an Elmo shaped pan!
Hi Tayla,
Thank you so much — I was pretty happy with the way the elmo cake came out, and my two-year-old was too 🙂 Yes, they sell the elmo cake pan on Amazon and I’ve seen it in stores like Walmart & Michael’s. It is a great way to make an elmo cake if you want to save time or are uncomfortable with shaping Elmo’s face yourself. I like experimenting with how to make different cakes without too many extra supplies, but this pan is a great option!
Charissa
What a cute cake! I love how you used the foil to shape his face. I never would have thought to do that!
Hi Emily,
Thanks so much! Yes, I thought about buying the Elmo cake pan for this one because I was feeling lazy, but the tin foil worked out well. I tried it on a whim a few years ago when making a BB8 birthday cake and I’ve been using it ever since, for any cake that isn’t a perfect square or rectangle. I’m too cheap to buy a bunch of new cake pans haha.
Thanks for reading!
Charissa
Hey, this looks fab. I will try making it for my 2 year olds birthday
Hi Ciara,
I’m so glad you liked it! I guess Elmo is universally loved by almost-two-year-olds everywhere! Best of luck with the Elmo cake — I hope you find it quick and easy!
Thanks for reading!
Charissa
You are brilliant! How did you ever come up with that way to shape it? And it worked perfect! What a great idea and a darling cake.
Hi Amy,
Thank you so much! You know, I was feeling pretty lazy this time around and thought about buying the Elmo cake pan, but I ran out of time to Amazon Prime it lol.
I discovered the tin foil idea when I tried it on a whim a few years ago when making a BB8 birthday cake for my oldest. Since then, I’ve used several times per year. It comes in really handy when you want a uniquely shaped cake but don’t have a special cake pan or don’t want to have to make two or three boxes-worth of cake mix.
Thanks for reading!
Charissa
What an adorable way to celebrate your child’s birthday. I love the detailed information. It looks like I could even do this. I am a disaster at decorating.
Hi Julie,
Thanks so much. I felt kind of bad that we weren’t giving the youngest an actual Elmo or Sesame Street birthday party, but things have just been so crazy around here. I’m hoping when he looks back on his pictures of his Elmo cake, he’ll just assume it was at a birthday party that we threw for him lol.
You could DEFINITELY DIY this Elmo cake. It really is easy and the “fur” frosting technique is super forgiving — and tasty!
Thanks for reading!
Charissa
I will let you know how easy it is once I give it a try. Cute idea.
Hi Candy,
Haha, definitely try it. It really was surprisingly easy to make this Elmo Cake. And the best news? Usually kids who are young enough to request an Elmo cake are also young enough to be easily impressed. Win-win!
Thanks for checking it out!
Charissa
That looks really super fun to make! I am still learning how to put the icing.